


Lesson 32 - Cross-Country Trip - Part 1
September 27, 2023

After yesterday’s night landing, we had a ground session to cover the next items on the list, and we decided to cover long cross-country trip this week. For the long cross-country requirements, I have to (as mentioned in Part 61.109):
Dual: 20 hours minimum of flight training with an instructor on the Private Pilot areas of operation including:
3 hours of cross country flight training in a single engine airplane;
3 hours of night flight training in a single engine airplane, that includes at least:
a) 1 cross country flight of over 100 nautical miles (nm) total distance; and
b) 10 Take-Off’s and 10 landings to a full stop with each involving a flight in the traffic pattern at an airport.3 hours of flight training by reference to instruments in a single engine airplane; and
3 hours of flight training in a single engine airplane within the 60 days prior to the practical test.
Solo: 10 hours minimum of solo flying in a single engine airplane on the Private Pilot areas of operation including:
5 hours of solo cross country flying;
1 solo cross country flight of at least 150nm total distance with full stop landings at 3 points and one segment of at least 50nm between T/O and landings; and
3 Take Offs and landings to a full-stop at an airport with an operating control tower.
We decided to fly the long cross-country to Zanesville, Ohio (KZZV), which is about 100nm toward West - SouthWest direction from Rostraver. I had a lot of homework to do. I needed to come up with a flight plan for my long cross-country flight and pick my visual checkpoints along the way.
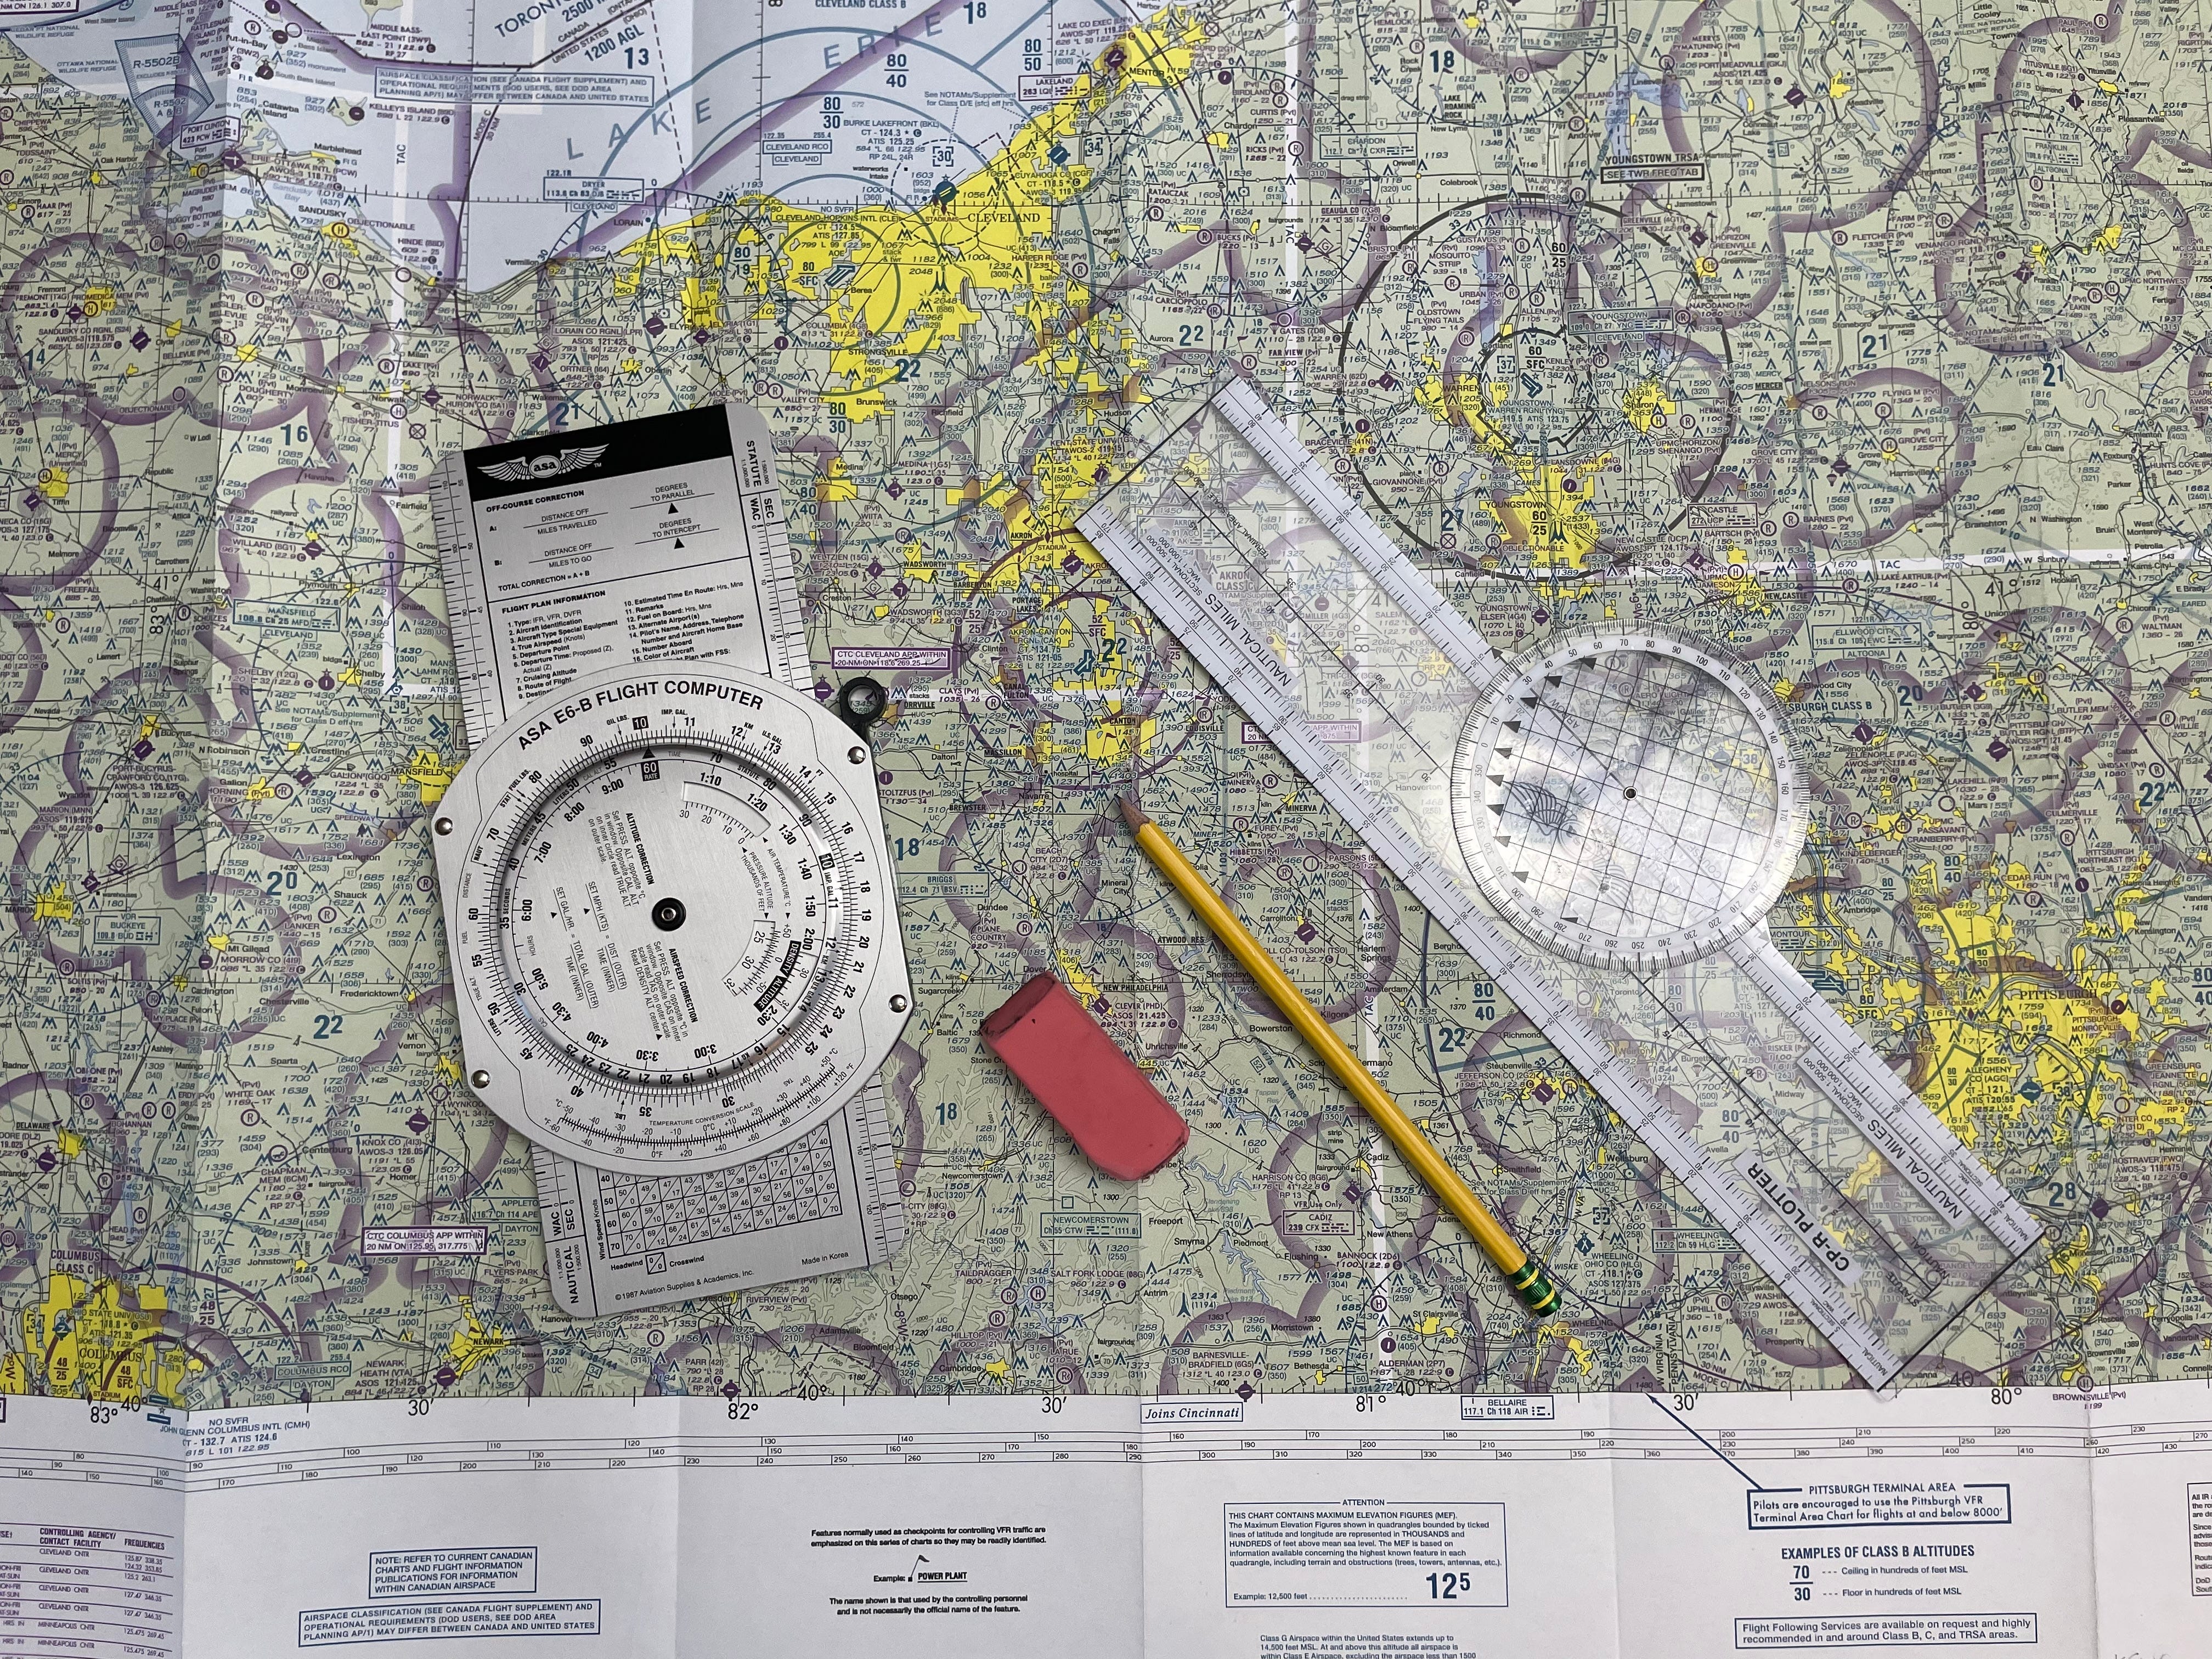
Before starting to work on my flight plan, I made sure that I have all the tools required. I needed -
Current sectional chart for the North-East region of US.
my E6-B calculator
my Plotter
a pencil
an eraser (knowing me - my eraser logs more mileage than pencil)
POH data from the plane
I was ready to start. I did a lot of research, checked out different ways pilots and their CFIs were going about preparing their XC flight plan. Based on my understanding of how it should unfold, I came up with following method to log my XC flight plan. This is going to be a bit lengthy, but if you are a process oriented person - you are going to love it.
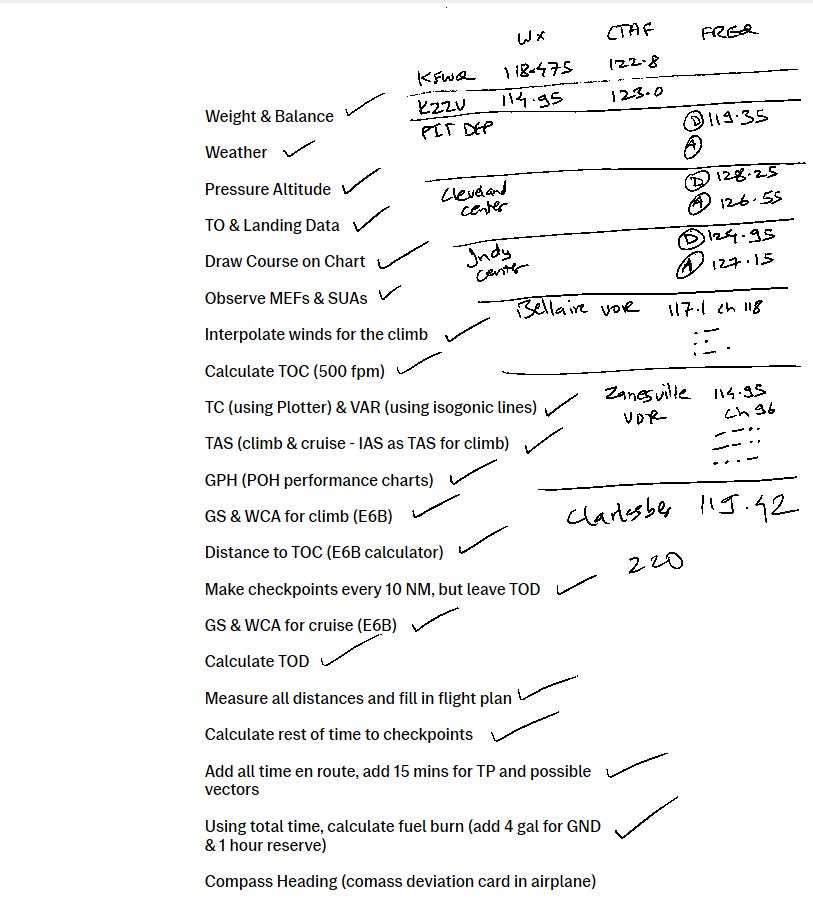
Step 1: Gather all the required data for your calculations
1. Weight and Balance
This is a key factor in your planning, from the standpoint of performance and stability of the airplane. All airplanes balance about their CG (Center of Gravity). CG’s location determines the airplane characteristics, such as critical angle of attack, take-off roll, landing distance, etc. The location of CG is affected by the total weight distribution of passengers, baggage, fuel, etc. That’s why it is imperative before any flight that pilot must determine that the weight and balance falls inside the manufacturer provided specifications for the safety of airplane and passengers.
2. Weather Data and Airport Diagram
This is a no-brainer. You need to know all the important weather information about your departure, arrival, and en-route weather. As a VFR pilot, you need to make sure you are not going to encounter any adverse conditions, such as high wind shears and turbulence, or thunderstorms, or dangerously low temperatures, or low ceiling cloud deck. Basically you need to review that the conditions you are flying under are not only VFR conditions, but also are within your personal minimums.
You also need to study and note down the departure and arrival airport data, such as runway headings, expected winds, surface elevation, CTAF frequency, ASOS/AWOS frequency, UNICOM frequency, etc. All this needs to be considered later in the calculations.
Step 2: Start your calculations
1. Calculate Take-off and Landing Distance
In order to determine how much distance you need to factor in for the take-off and landing distances, you need to relate the current outside conditions to the standard conditions (which is at sea level at 15 degree Centigrade at barometric pressure of 29.92 Hg. You need to refer to the take-off and landing chart given in Operating Manual to ensure that your departure and arrival airports have sufficient runway.
2. Draw your course on the sectional chart
Now the fun part starts. Once you have located the destination and arrival airports on the sectional chart, just draw a straight line between the two airports. There is a lot of detail on the sectional chart, but once you familiarize yourself, it becomes less overwhelming. You draw a straight line between the airports, observe your true course direction, observe for MEFs (Maximum Elevation Figures) for determining the appropriate altitude for your cruise, and SUAs (Special Use Airspace), such as Prohibited, Restricted, Alert, Military Operations, or Warning area along your path. Last thing you need is to be escorted by an F-35s out of restricted airspace, or worse, get shot down becasue you didn’t communicate with them. They literally have zero tolerance.
The tools you use for this set of calculations are sectional chart and plotter.
Once you have drawn the straight line path, using plotter, try and identify your visual checkpoints at about 10-15 miles apart. In good conditions, from higher altitude you should be able to see at least 10 miles ahead of you, so having the visual checkpoints around that distance makes logical sense. Using your plotter scale - sectional side, you can measure the distance of 10 miles or so. While picking those points, pay attention to pick something that is easily identifiable, such as roads, towns, lakes, rivers, airports, etc. Also, try to find it a little left or right of your course, so that it can be seen easily.
3. Calculate TOC and TOD
On a perfect day when you fly your cross-country, you typically take-off, climb upto your cruise altitude, cruise along your determined altitude, slowly descent once the destination airport is in sight, and then land. The points where cruise altitude starts and ends, are called Top of Climb and Top of Descent respectively. You need to calculate the time, distance, and fuel burn for TOC and TOD points.
The factors you need to consider for calculating TOC and TOD are winds for climb and descent, airspeed and groundspeed, and course heading, both true and magnetic. Remember elementary geography - earth’s magnetic north pole and true north pole are not same. So you need to consider the difference while calculating your true heading, and magnetic heading. As for winds, you need to calculate the wind correction angle (WCA), since wind may push you away from your true course. This is where the flight claculator E6B is your friend. It is very handy, and once you learn how to use it, calculating speed, time, distance, and fuel burn becomes very easy.
At the end of TOC and TOD calculations, you will have Ground Speed, Estimated Time, and Fuel Burn expected for your climb and descent.
4. Calculate Cruise
The similar set of calculations need to be done for your cruise altitude. For cruise, you will be flying at an altitude, where winds and temperatures are going to be different. To factor that in, you need to get the winds aloft data when you are gathering your weather data for the altitude you are planning to fly at. There is a good amount of interpolation needed based on the weather reporting stations and altitudes, but for the most part, taking simple averages suffice for the planning purposes. Again, E6B comes really handy to calculate the numbers for WCA, Ground Speed, Fuel Burn, etc.
At the end of this section, you will have Ground Speed, Estimated Time and Fuel Burn calculated for each leg of your cruise portion of the flight plan.
Step 3: Bringing it all together
With all the calculations done, it is now time to fill in all the details. Measure the distances, true airspeed, groundspeed, WCA, true course, magnetic course, estimated time and fill it in in your flight plan. Fill in the times between each leg that way you can track the actual against it en route. Add all the time, and calculate the total expected fuel burn. In the fuel calculation, make sure to factor in fuel for ground operations and additional 1 hour worth of reserve fuel.
Another factor to consider is to maintain a list of 3 to 4 nearby airports, just in case. It only takes one small change to throw your preparation ouf of the window. The fuel farm may be out of service, or runway may be closed. One can never be overprepared when it comes to aviation.
Result
After 3 hours of meticulous planning, finally I had my flight plan from KFWQ to KZZV ready for execution.


Why Flight Planning?
Why is flight planning signifincant? In general aviation, the most important thing to manage is fuel. At any point in time, you need to make sure that you have enough fuel, and that is the most important thing to plan for. That is why you always plan for extra fuel for unforeseen consequences.